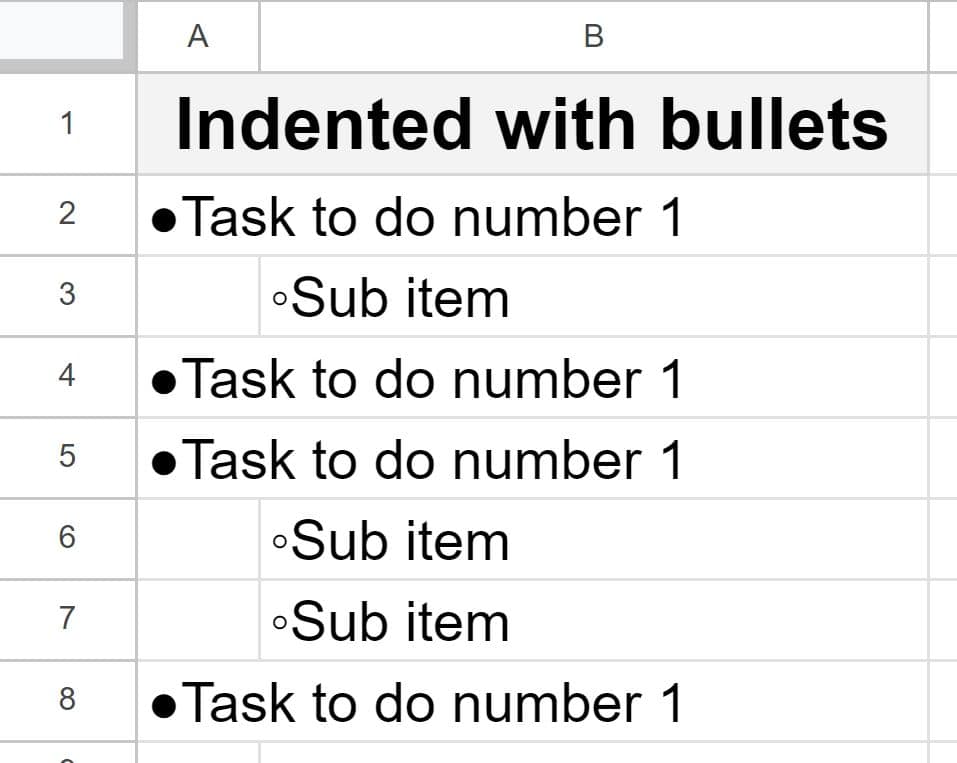
Are you looking for a way to insert bullet points in Google Sheets, but can’t seem to find the button for it? There is not a bullet point button, but there are several ways to insert bullet points in a Google spreadsheet and I will show you all of them in this lesson.
To insert a bullet point in Google Sheets, double-click on a cell to begin editing the cell, then hold down the “Alt” key while typing the numbers 0149, and a bullet point will appear inside the cell.
See below for more detail on this method as well as other methods for inserting a bullet point in Google Sheets such as by using a formula.
Insert a bullet point by copying and pasting a bullet point character from the internet to your spreadsheet
Perhaps the easiest way to insert a bullet point into a Google spreadsheet is to copy and paste a bullet point from somewhere on your computer / the internet into your spreadsheet. For example, below there are a variety of bullet points listed, and each can be copied and pasted into your spreadsheet.
Also, as shown in the image directly below, you can choose to enter bullet points in the same cell that you type your text in (demonstrated in row 1), or you can insert the bullet points in their own individual cell, where the text that is associated with the bullet point is entered in the cell to the right of the cell containing the bullet point (demonstrated in row 2).

Bullet point sizes
Remember that once the bullet point is inserted / pasted into your spreadsheet, you can adjust the font size of the cell which will adjust the size of the bullet point. But as you will see there are also multiple sizes of bullet point characters, aside from font size. Choosing the right one can help to make sure that the bullet point is the right size in comparison to the text.
Click here to get your Google Sheets cheat sheet
Bullet point characters to copy and paste into your sheet
Below is an assortment of bullet points that you can copy and paste into your own spreadsheet. See below for how to use formulas to insert bullet points.
●
•
◦
‣
∙
«
»
‣
Use a formula to insert a bullet point
You can also insert bullet points into a Google spreadsheet by using the CHAR formula. “Char” stands for “Character”. The CHAR function allows you to specify a specific character (such as special symbols etc.) by entering a character code into the function.
A bullet point is a “character” just like letters, numbers, punctuation, etc. There are two different character codes / bullet point sizes that we will go over below. The larger bullet point can be inserted by using the character code “9679”, and the smaller bullet point can be inserted by using the character code “8226”.
To insert a bullet point by using a formula in Google Sheets, follow these steps:
- Select the cell where you want to insert a bullet point
- Type =CHAR ( to begin the formula
- Type 9679 to insert a large bullet point, or type 8226 to insert a small bullet point
- Press “Enter” on the keyboard. The final formula will look like this: =CHAR (9679)
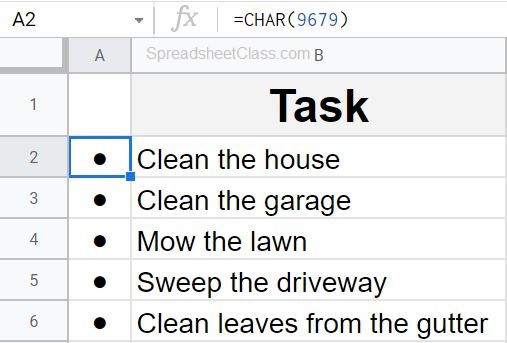
Character 9679 (Large bullet point)
Below is an example of using the character code 9679 with the CHAR function, which inserts a large bullet point.
=CHAR (9679)
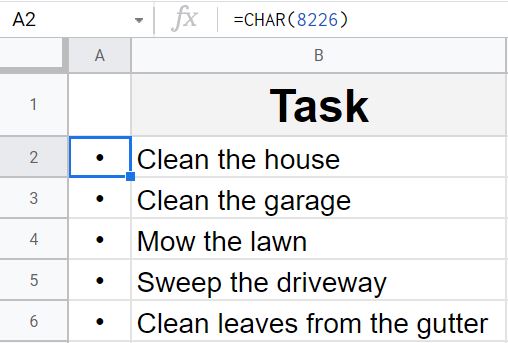
Character 8226 (Small bullet point)
Below is an example of using the character code 8226 with the CHAR function, which inserts a small bullet point.
=CHAR (8226)
If you want to create a bulleted list where each item / bullet point is on a new line within the same cell, you can learn how to insert a new line within a cell.
Use an Alt code to insert a bullet point
Once you get used to it, using an Alt code becomes the fastest way to insert a bullet point in a Google spreadsheet. The key is to make sure that you are editing a cell (cell is in edit mode with cursor blinking) before typing the Alt code, otherwise it will not work.
To edit a cell, either double click on the cell, or select the cell and the press enter. When the cell is being edited, you will see the cursor blinking inside of the cell. This is when the spreadsheet is ready to accept the Alt code for inserting a bullet point.
To insert a bullet point by using an Alt code in Google Sheets, follow these steps:
- Select the cell where you want to insert a bullet point
- Double-click on the cell to begin editing the cell
- Press and hold the “Alt” key on the keyboard.
- Type the number 0149 (fast). A bullet point will appear inside the cell
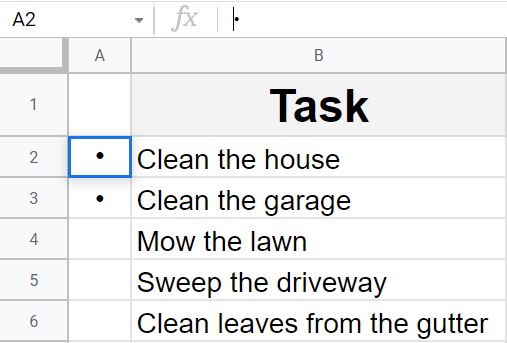
Alt + 0149
Below is an example of a bullet point that has appeared after using the Alt code 0149.
Use custom formatting to automatically insert bullet points
If you want, you can make your Google spreadsheet automatically insert bullet points in specific cells, by using custom formatting. This will make it so that when you enter text into a cell with the custom formatting, the bullet point will automatically appear in the cell but will not be entered as a character that can be deleted easily… and it will not get in your way when typing.
To automatically inserts bullet points in Google Sheets, follow these steps:
- Select the cell / range of cells that you want to apply the formatting to
- Click the “Mor formats” menu on the top toolbar, which is a button that says “123”
- Click “Custom number format”
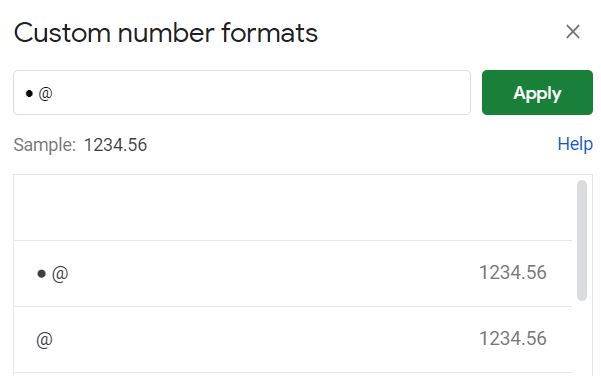
- Enter a bullet point, followed by an @ symbol, in the field of the menu that pops up, like this: ●@
- Click “Apply”
Now your spreadsheet will automatically insert bullet points into the cells that you applied the formatting to. See below for the illustrated instructions.
Make sure that you select the cells that you want to format first. Then click the “More formats” menu on the top menu, which is the button that says “123”. Then click “Custom number format”.
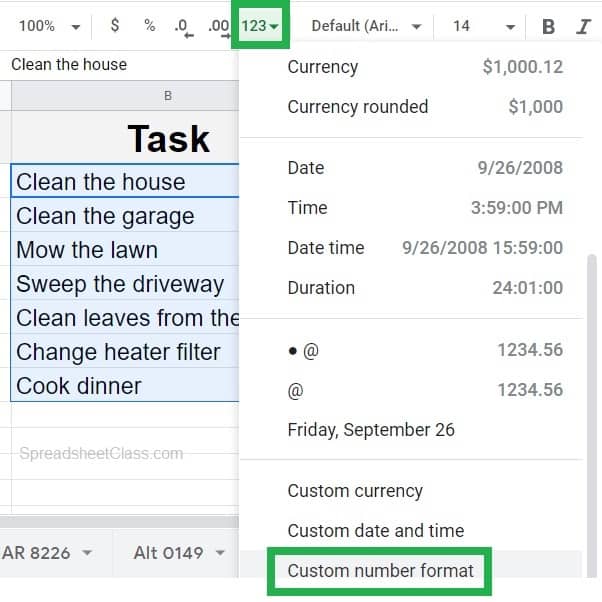
In the menu that pops up, enter a bullet point, followed by an @ symbol. This indicates to Google Sheets to insert a bullet point before characters that are entered into the cells. Then click “Apply”.
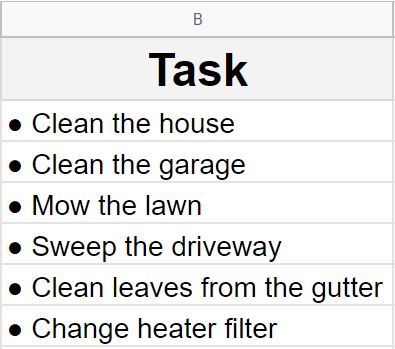
As you can see in the image below, the listed tasks each contain a bullet point before the text / task name. But in this case, the bullet points were not typed and automatically appeared after entering the text in each line.
Combining the CHAR function with existing text to insert bullet points in bulk
If you want, you can combine the bullet points that you insert with formulas, with text that is already entered in other cells. There are several ways to do this. First, let’s go over combining the CHAR function with text that is entered into cells.
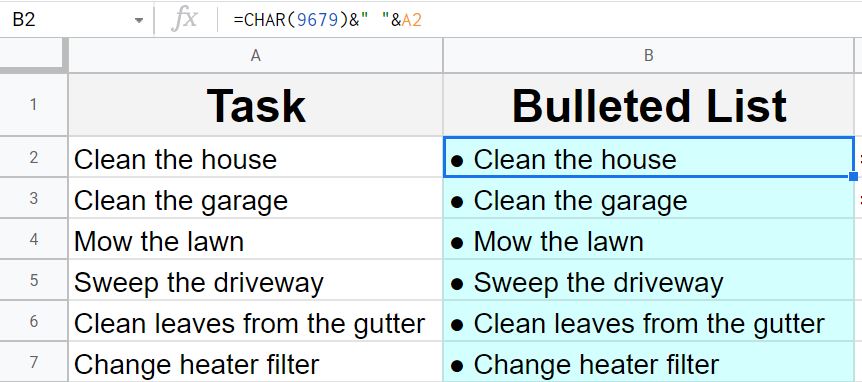
As shown in the example image below, we want to combine the text from the task list with bullet points, by using formulas. We will do this by using the ampersand / “&” operator to combine text / characters / cells.
In the formula directly below, we are telling Google Sheets to combine a bullet point with the text that is entered into cell A2. We have also told Google Sheets to put a space between the bullet point and the text, as shown in the image.
=CHAR (9679)&” “&A2
In the formula directly below, we combined the bullet point with the text entered in the cell, without including a space between the bullet point and the text.
=CHAR (9679)&A1
Combining a bullet point character with existing text to insert bullet points in bulk
We can also use the ampersand to combine bullet points and text, if the bullet point is entered into a cell (rather than using the CHAR function). Or if you want you can also enter the bullet point character directly into the formula.
The formula directly below combines the bullet point entered into cell A1, with the text from the task list, as shown in the image.
=A$1&B2
The formula directly below combines a bullet point with the text in the cell, but in this case the bullet point character is entered directly into the formula.
‘=”●”&B2
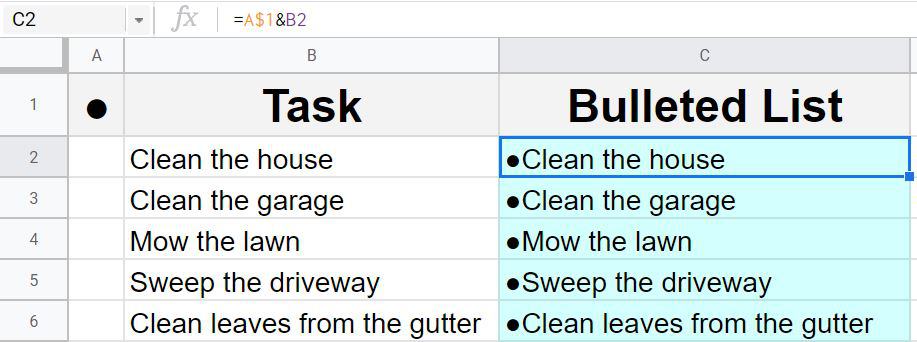
How to copy bullet points down the column
Now that you know how to use the ampersand / “&” operator to combine strings of text / cells to combine bullet points and text, let’s quickly go over how to copy formula down a column so that you can easily insert bullet points quickly.
Click the article linked above to learn more about how to do this, as well as how to lock cell references.
Copying / filling bullet point formulas down the column
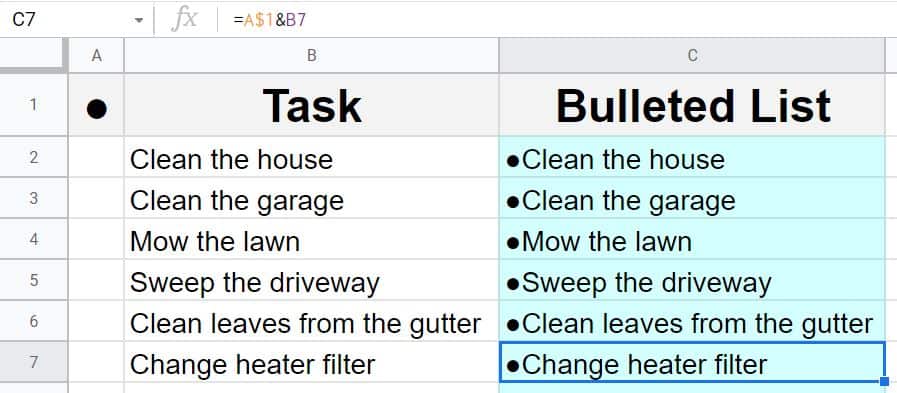
As shown in the image below, when the formula below is copied and pasted into the cells below it, Google Sheets automatically adjusts the cell references to appropriately apply each new formula to the appropriate row. Notice that in the reference to cell A1, we have included a dollar sign before the row number, like this: A$1. This dollar sign locks the reference to the row so that when the formula is copied and pasted into another cell / row, the row number will not change. In this case I did this because I want to continue referring to the bullet point in cell A1 as the formula is copied and pasted in the cells below.
=A$1&B2
=A$1&B7
This content was originally created by Corey Bustos / SpreadsheetClass.com
Using ARRAYFORMULA to add bullet point to an entire column in a single formula
If you want, instead of using individual formulas to copy bullet points down the column, you can use the ARRAYFORMULA function to apply the formula to an entire column.
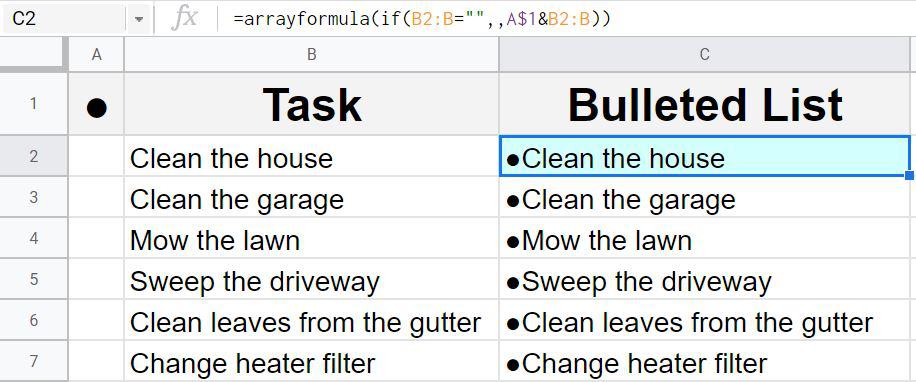
The formulas below (as well as the image) provide an example of how to use the ARRAYFORMULA function to combine text with bullet points, where the functionality of a formula is applied to a whole column by using a single formula. Click the article linked above to learn more about using the ARRAYFORMULA function.
=arrayformula(if(B2:B=””,,A$1&B2:B))
=arrayformula(A$1&B2:B)
Indenting a bulleted list
If you want to indent your list items when using bullet points, there are multiple ways to do this.
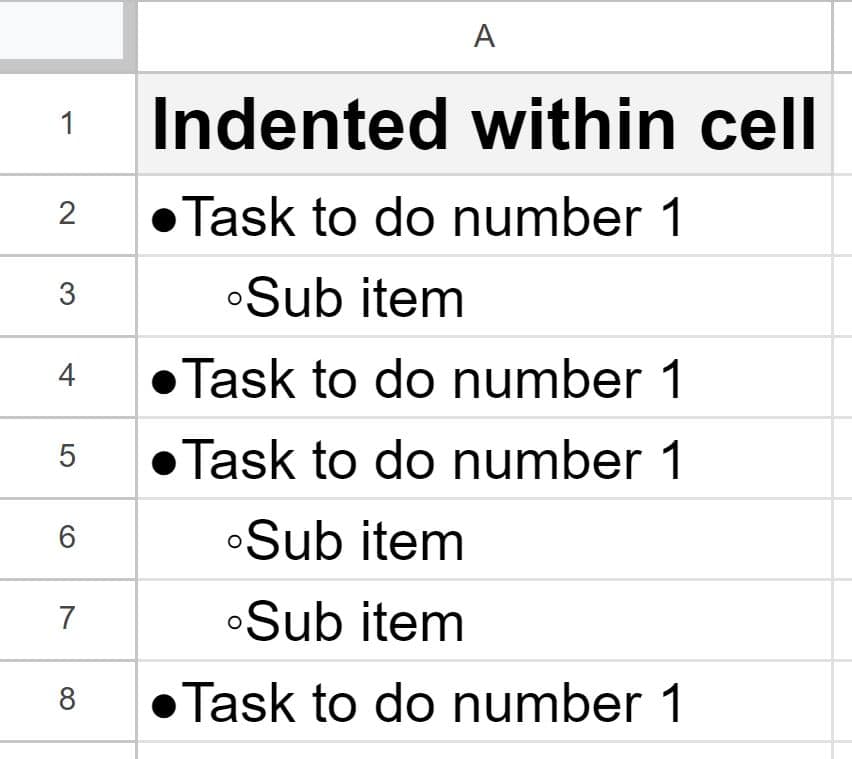
Method 1: You can indent inside of the cell itself, by either manually adding spaces before the item you wish to indent, or by doing it automatically with custom formatting.
As you can see in the image below, some of the items in the list are indented, and a different bullet point is used for the indented items.
Method 2: You can use multiple columns to create multiple levels of indentation. Adjust the width of the columns to make them narrow, so that there is a slight indentation but not too much.
As you can see in the image below, some items are listed in column A, and some items are listed in column B. A different bullet point is being used in each column / each level of indentation. Column A was narrowed to make the items in B slightly indented.
