If you want to remove duplicates and filter your data with a single formula in Google Sheets, you can do this by combining the UNIQUE function with the FILTER function.
In this lesson I am going to show you multiple ways of combining these two functions, so that you can remove duplicates and filter with a single formula.
To use the UNIQUE and FILTER functions in a single formula, follow these steps:
- Start by typing your filter formula, like this: =FILTER(A2:B,B2:B=”Criteria”)
- Then use the UNIQUE function to remove duplicates from the filter results, like this: =UNIQUE(FILTER(A2:B,B2:B=”Criteria”))
UNIQUE FILTER formulas in Google Sheets:
Remove duplicates from filter results where criteria is “equal to“
- =UNIQUE(FILTER(A3:B,B3:B=”Shirt”))
Remove duplicates from filter results where criteria is “NOT equal to“
- =UNIQUE(FILTER(A3:C,A3:A<>”Shirt”))
UNIQUE / FILTER nested formula
In this lesson we are using multiple functions combined together in a formula, where the results of one function is used as the criteria of another function and this is called a “nested formula”, which means that we are “nesting” one function inside of another function. Another way to say this, is that a formula is “wrapped” around another formula. For example, in the formula below, the FILTER function is nested inside of the UNIQUE function, and the UNIQUE function is “wrapped” around the FILTER function.
You can use the output of your FILTER function as your UNIQUE function range like this: =UNIQUE(FILTER(A3:B,B3:B=”Text”))
This lesson focuses on combining the FILTER and UNIQUE functions, but if you want to learn how to use the functions individually, check out the lessons linked below:
Remove duplicates from filter results
Let’s go over a simple example of using the FILTER function and the UNIQUE function together in Google Sheets.
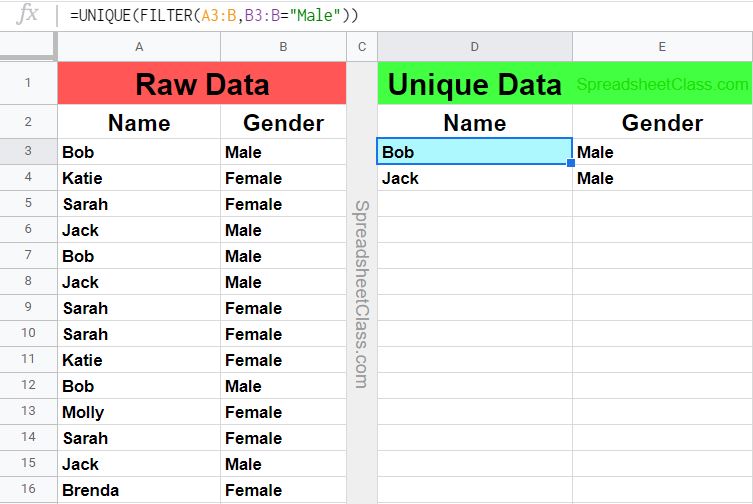
In this example, we have two columns of data… names in column A, and gender in column B. What we are going to do is filter the data so that only data pertaining to men is displayed, and so that any duplicates are removed from the result.
The task: Filter the demographics data to show only males, and remove duplicates too
The logic: Filter the range A3:B, where the range B3:B is equal to the text “Male”, and then remove the duplicates
The formula: The formula below, is entered in the blue cell (D3), for this example
=UNIQUE(FILTER(A3:B,B3:B=”Male”))

As you can see in the image above, on the right side of the sheet, the data has been filtered to only display males, and duplicate entries have been removed.
Remove duplicates and filter where criteria is “NOT equal to”
Now let’s go over an example where we will specify the criteria that we do not want in the filter results, instead of specifying the criteria that we do want. In other words we will filter the data where the specified criteria is “not equal to”.
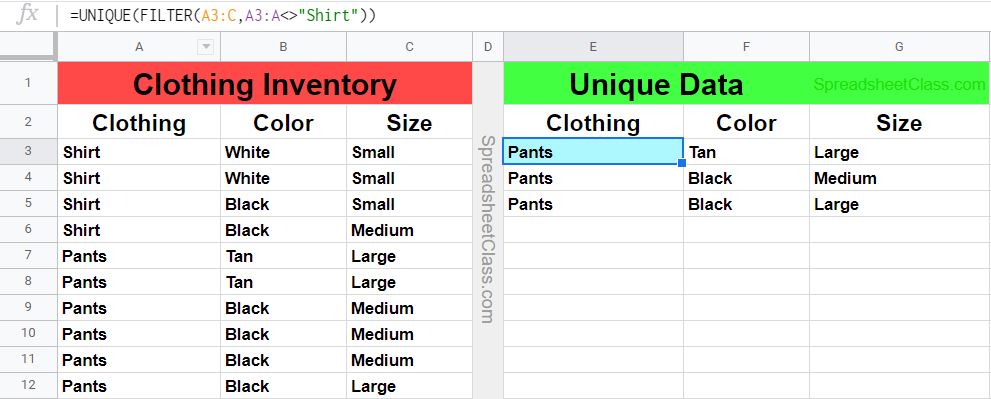
In this example we have inventory data, and we are going to filter the data to display only entries where the clothing name is not “Shirt”. We will also remove the duplicates from the results.
To do this we will need to use the “not equal” operator in the FILTER function, which is a less than symbol followed by a greater than symbol (<>).
The task: Display only data pertaining to clothing items that are not shirts, and remove duplicate entries
The logic: Filter the range A3:C where the range A3:A is not equal to “Shirt”, and then remove duplicates from the result
The formula: The formula below, is entered in the blue cell (E3), for this example
=UNIQUE(FILTER(A3:C,A3:A<>”Shirt”))

In the image above, you can see that on the right side of the sheet, the formula displays only the inventory items that are not shirts, and the duplicate entries have been removed as well.
Now you know how to filter your data and remove duplicates from it by using a single formula in Google Sheets!

