If you need an easy and free place to track your inventory, this Google Sheets Inventory Template will help you track your inventory items, and will also allow you to track the purchase / sales value of your inventory.
Whether you have a warehouse full of items, own a small shop, or simply want to keep track of office inventory, you will be able to use this template for any of your inventory tracking needs.
To track inventory in Google Sheets, make a copy of the template linked below. Then enter the item names, quantities, and other optional information about your items, into the template:
See more Google Sheets templates

Note that the columns which should not be edited (Those that have formulas) are colored light grey, where the columns that can be edited are white. Also, any cell that should not be edited will display a warning if you try to edit it.
Get your Google Sheets formula cheat sheet
Learn to build dashboards in Google Sheets
Using the template for multiple purposes / businesses
This inventory template has a lot of different features in it, so that it can be used by a wide variety of businesses, from warehouses, to small shops, to people who run online stores from home.
As you will see in the instructions below, only the first three columns of the template are needed to track the items / quantities of items that you have.
That being said, you can hide any of the columns that you don’t want to use / see, to make the template much more simple. To hide a column, right click at the top of the column that you want to hide, and then click “Hide column”.
Entering items and other information into the inventory template
There is a wide range of information that you can track in the Google Sheets inventory template. Below are instructions on where to enter different types of information into the template.
Remember that only the first three columns in the template are essential. The other columns can be ignored or hidden if they do not apply to your needs.
Enter basic information into columns A, B, and C
In columns A, B, and C, you can enter the names of your inventory items, as well as the quantities that you have for each item. If you would like you can also enter the “Item ID” for your items.
Columns for “On Order”, Max Quantity”, and “Expiration Date”
Beyond knowing how many of each item you have in stock, you may also want to track how many of each item that you have on order, and the maximum quantity for each item. The template has a place for you to record these amounts, in columns D and E.
The template also has a column where you can track the expiration date of your items. At the top of this column, today’s date will display.
In the “Expiration Date” column, the cells will turn red in the rows that contain items that have expired.
View detailed totals and stock status
After you have entered the item information / amounts, you can view the totals and status indications in columns G through K.
Order Needs: This column will show you how many items should be ordered to reach the maximum quantity for an item (Considering the current amount in stock)
Quantity + Order: This total shows you the current quantity of items that you have, added to the quantity of items that are on order
Stock Status: This column shows whether each item is in stock or not, based on the enter quantities
If there are 1 or more of a certain item, this indication will say “In Stock” and the cell will be green.
If there are 0 of a certain item, this indication will say “Out of Stock” and the cell will be red.
If a maximum quantity is entered, and if there are more items in inventory than the maximum quantity, this indication will say “Overstocked” and the cell will be blue.
Order Status: If there are 1 or more of a certain item on order, this indication will say “On Order” and the cell will be yellow
Entering item locations
If you have a warehouse, a shop with aisles, or even a shop that has multiple vendors, you may want to record the locations of your items.
The inventory template allows you to record the aisle, slot, and level of each item, in columns L, M, and N.
Location Code: Column K will generate a location code based on the aisle, slot, and level that you enter for each item. This code will separate the numbers for aisle, slot, and level, with a hyphen (-).
For example, if your item was in aisle 3, slot 115, and on level B of that slot, after entering these numbers into columns L through N, the location code that the template will generate in column K, will be the following:
3-115-B
You can adapt this to your specific needs / terminology by simply changing the headers for the location columns. So let’s say that you own an antique store and your store is separated by sections and vendors. You could simply change the “Aisle” header text to “Section”, and change the “Slot” header text to “Vendor”.
The location code formula is set so that you do not need to use all three parts of the location code. So if you left the third column (“Level”) blank, the location code would detect this and will give a shorter code without putting any extra hyphens. For example: 3-115
In column O, you can also record where your items came from / where they were purchased from, in the “Vendor / Supplier” column.
Tracking the purchase price and the sales price of your inventory
The Google Sheets inventory template will also allow you to track the purchase price and sales price of your items, and therefore will show you a variety of totals related to profit and the value of your inventory.

Content by Corey Bustos / SpreadsheetClass.com
Entering the purchase price and sales price
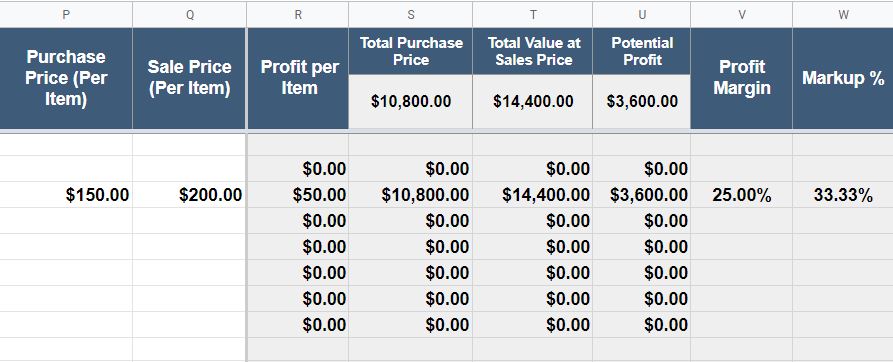
Purchase Price (Per Item): In column P, enter the price that you paid per item, for each different type of item in your inventory. If you purchased multiple lots of the same item at a different price, you can enter the adjusted / average purchase price for the items
Sale Price (Per Item): In column Q, enter the price that you sell / intend to sell the items for
Understanding the inventory value totals
After you have entered the quantities that you have of each item, as well as the purchase prices and sales prices, you will be able to view the totals / calculations below:
- Profit per item: The dollar amount of profit for each item
- Total Purchase Price: The total purchase amount considering the current quantity of each item, at the listed purchase price (per item)
- Total Value at Sales Price: The total value of the inventory, considering the current quantity of each item, at the current sales price
- Potential Profit: The total dollar amount of potential profit, considering the current quantity of items, at the current purchase / sales price
- Profit Margin: The percentage of profit earned on each sale
- Markup %: The percentage increase from the purchase price to the sales price
All columns / features available in the inventory template
Below is a list of each column in the inventory template, which also represents most of the features that the template contains, other than conditional formatting.
- Item ID
- Item
- Quantity
- On Order
- Max Quantity
- Expiration Date
- Order Needs
- “Quantity + Order”
- Stock Status
- Order Status
- Location Code
- Aisle
- Slot
- Level
- Vendor / Supplier
- Purchase Price (Per Item)
- Sale Price (Per Item)
- Profit per Item
- Total Purchase Price
- Total Value at Sales Price
- Potential Profit
- Profit Margin
- Markup %

